Showing posts with label photoshop. Show all posts

Friday, March 7, 2008

Control your actions, right now!

Your Photoshop Actions, that is! ;)

Don't you just love PS actions? I do. I have tons of them, actions to make stitches around something, actions to make buttons, actions to make a special effect, etc etc.

Have you ever wished that you could edit them, change a little something, for example, the size of the stitch, or a feathering set that's just too much?

I will show you how.

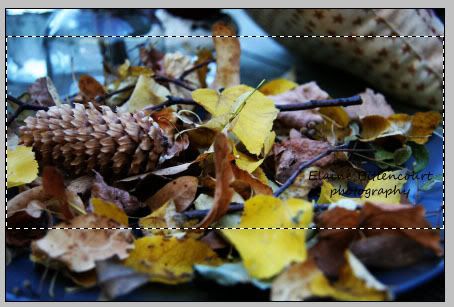
1. First, open an image, any image will do, it can be anything that you like, I suggest opening a jpg, not too big, just for the heck of this tutorial;

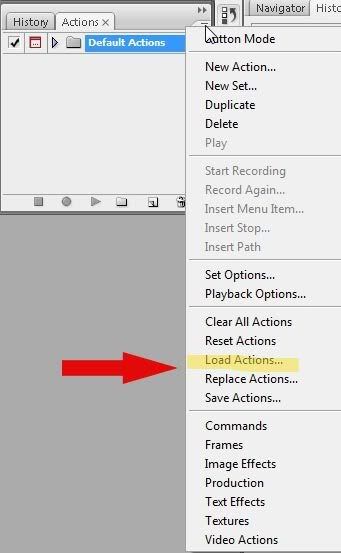
2. Let's take a quick look at your actions palette. Photoshop comes with some basic actions, let's load a set.

image 1


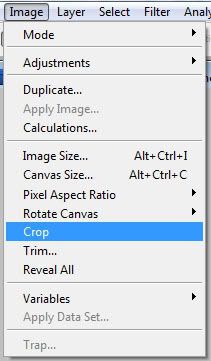
3. Open your actions palette, you should see a group of actions under "default actions". If it's not there, click on the drop down menu (refer to image), choose "load actions..." and browse for your photoshop preset folder - that will usually be at: yourcomputer>program files>adobe>adobe photoshop>presets>actions, and load any of the actions that you see in the actions folder. I am going to use one of the default actions for this tutorial. If you want to use the same action as me but you dont' have the default actions loaded, you can reset your actions palette by clicking on the drop down menu, and choosing "reset actions". If you have other actions in your palette, you might want to "append" these when you're prompted.

image 2


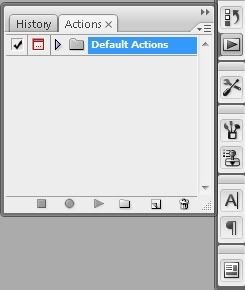
4. Click on the little arrow beside the default actions on the action palette. That will expand the folder so you can see all the actions in that group (the default actions is a group of actions, an "action set").

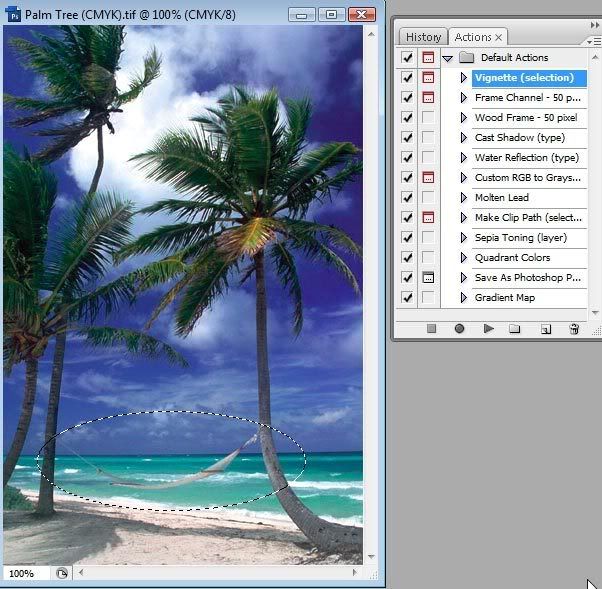
5. Highlight the first one on the list "vignette", and using the rounded marquee tool make a selection anywhere in your image:

image 3


6. Play (run) the action; this particular action pauses and asks you for the amount of feathering you want to apply to the image, type any number you want and click ok. Now you have the action result. But you're not very happy with the action. You want the action to NOT stop and prompt you for the feathering, and you want the feathering be 10 everytime you run that action. Let's change it! ;)

7. Most important step of all in this tutorial: duplicate your action BEFORE you make any changes to it. To do so, highlight the action, drag and drop it on the "new action" icon on the bottom of your action palette. Now change the name of that duplicated action to anything you like.

8. click on the arrow beside the duplicated action to expand all the steps. Go ahead and click on the arrows inside that action to expand each and every step as well:

image 4


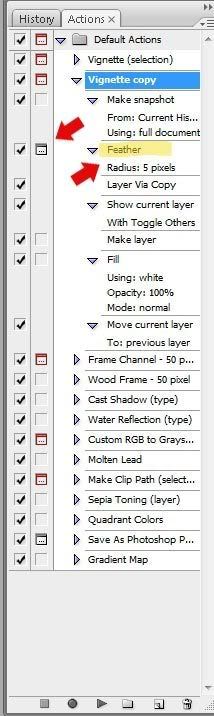
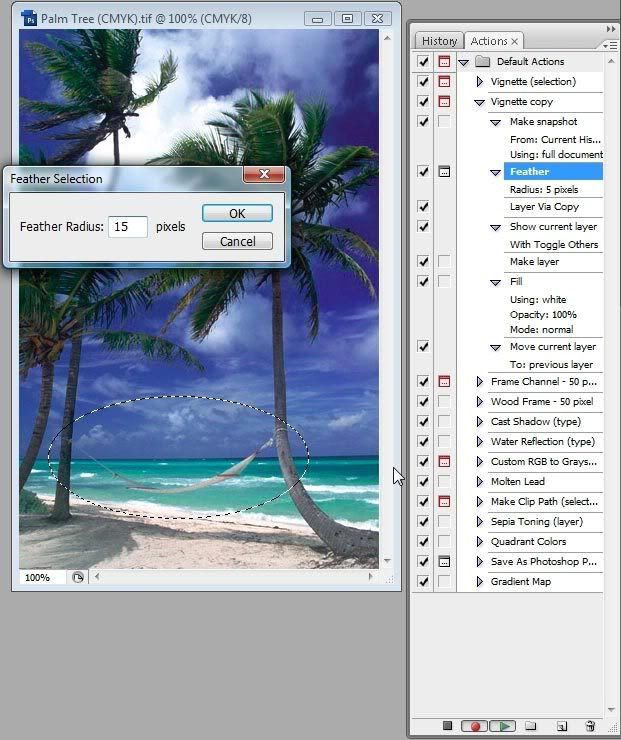
9. Now, make a selection anywhere in your image, as you did before. Double click on the "feather" step. When you are prompt to type the number, type anything that you like (other than 5, which is the default for this action step, I will type 15). Note: the record button on the bottom of your action palette is ON! ;) Click ok; the radius changed to 15 in your action step. Everytime that you run this action, the default feathering number will be 15.

image 5


10. Let's make the action run without stopping to ask you for the feather number. Do you see that little square right beside the feather step? Click on it to disable it. Don't worry, you can unable it again by simply clicking on it.

11. Now go back to your image, make a selection, and run your new edited action! Enjoy! =)


If you have any questions about my tutorial, feel free to post it here or email me.

..:: ::..

Sunday, October 14, 2007

Photoshop and spell check

Do you know that you can spellcheck text you type in Photoshop? Cool huh? No excuses anymore! =)

This is what you do - either CS2 or CS3: type your text, select it and then go to edit>spell checking.

Easy as pie!

I hope you all had a great weekend, mine was really busy, I had a memoir to finish writing for my Personal Journey class, plus yesterday I had to go out and shoot for a project due tomorrow! I also had to take some film to process (for a 4x5 large format camera project). I am looking forward to seeing those films processed, scanned, and printed! I took it to a place in Toronto called Image Works, owned by no other than Edward Burtynsky, make sure to check his photography site!

This is going to be a very busy week, tomorrow I have a full day at school, need to book one of the Studios for my first studio shooting! Fun! And the project is very interesting too, I will talk more about it sometime this week.

I've been planning to post some pictures but it's just not happening, sorry!

Wishing you all a great week!

..:: Blessings! ::..

Tuesday, October 2, 2007

Photoshop CS2/CS3 quick tip

So there you are, working on Photoshop, maybe it's a picture of your grandma, of your better half (not referring to your pet here), or your pet. ;) Or is it a graphic?
Doesn't matter.
You changed a setting in a box, let's say the image size box. And then realized you changed too many of the settings and forgot which ones, or you want to compare to what it was before changing it? No need to close that box by clicking on cancel and opening it again. Just hover your mouse on the "cancel" button and press the ALT (windows) or OPTION (mac). Voila! The buttons changes to "reset". ;)

Gotta run, need to mount a 4x5 camera on my tripod!

..:: Be Happy ::..

Wednesday, September 26, 2007

Neat trick I learned today

As I am learning more and more of Photoshop CS3, I am discovering some really interesting things. I learned something today that I didn't know it could be done. I started in graphics using Jasc PSP (now Corel), version 7. When I switched to Photoshop last year, it was only natural that I'd try to do things the psp way. I really missed some psp features that I couldn't find in Photoshop. One of them was "cropping to selection", which I show how to do in PSCS3 below:

Using your marquee tool, draw a selection around the part you want to keep, like so:


Now while still selected, go to


And here is your image cropped to your selection, just deselect and keep working! =)


Here's another neat little trick I learned. When you want to zoom in an image, press and hold Ctrl+space bar; you will see that your cursor will change into a magnifier, just click anywhere inside the image to zoom in. To zoom out, while holding Ctrl+space bar, right-click with your mouse and choose one of the options. You can always use Ctrl+(+ - signs) to zoom in or out as well. =)
If you want to zoom in on a specific part of the image, press and hold Ctrl+space bar, and with your mouse draw a selection around the part of the image that you want to zoom in. I thought this one was pretty neat!

Well, I hope you have enjoyed! I am sure most of you knew about all this already, but I wanted to share anyway.
If you subscribe to any feed reader, keep an eye on my blog, I will be posting any other little tricks about Photoshop as I learn!

..:: Blessings ::..